Audio Cutter: Extract a Section From a Recording
To pull one passage out of a long recording, open it in the Audio Cutter, a free audio cutter that runs in your browser. Drag the Trim Start slider to just before the passage and the Trim End slider to just after it, check it with Play Selection, then click Cut & Download. The cut itself is quick; finding the right spot in a 90-minute file is what takes time. There's no account, and your audio never leaves your device.
This is the keep-the-middle job: one answer from a Q&A, one decision from a meeting, four minutes of a two-hour DJ set. Need the opposite, deleting a cough or a fluffed line from the middle and keeping both sides? See Audio Cutter: Remove a Section From Audio. If you only need to shave silence off a file's ends, the same audio trimmer handles that too, and How to Trim Dead Air From Audio Ends walks through it.
What you'll need
- The recording as a file on your device: MP3, WAV, M4A or anything else your browser can decode. The cutter works on a file you already have, not a link.
- A rough timestamp for the moment you want, even if it's only "about 40 minutes in."
- Headphones, ideally. Laptop speakers hide the quiet breath or word at a passage's edge.
Find the passage first
In a long lecture or meeting, the hard part is locating the passage, so do that before you touch the sliders.
The fastest route is a timestamp you already have: one you jotted down, the lecture's chapter notes, or a transcript with timecodes from your meeting app. Search the transcript for a phrase you remember, read off the time, and you know where to aim.
Without a timestamp, use the waveform. When a file first loads, the selection covers the whole recording, so Play Selection plays from the beginning. While it's playing, click anywhere on the waveform to jump there. Clicking the waveform moves playback only; it doesn't set your trim points.
The shape helps you guess where to click. A long, flat stretch is often a pause, like the gap before a Q&A. A dense, sustained block in a lecture can be applause. In a DJ set, quieter dips usually mark transitions. On a long file the drawing is compressed, so treat these as hints and confirm by ear. What Is a Waveform? explains what the shapes mean.
How to extract a section with the audio cutter
- Open the Audio Cutter and drop your file into the dropzone, or click to browse. Your browser decodes it locally behind a "Decoding audio binary buffers..." overlay, then the waveform appears.
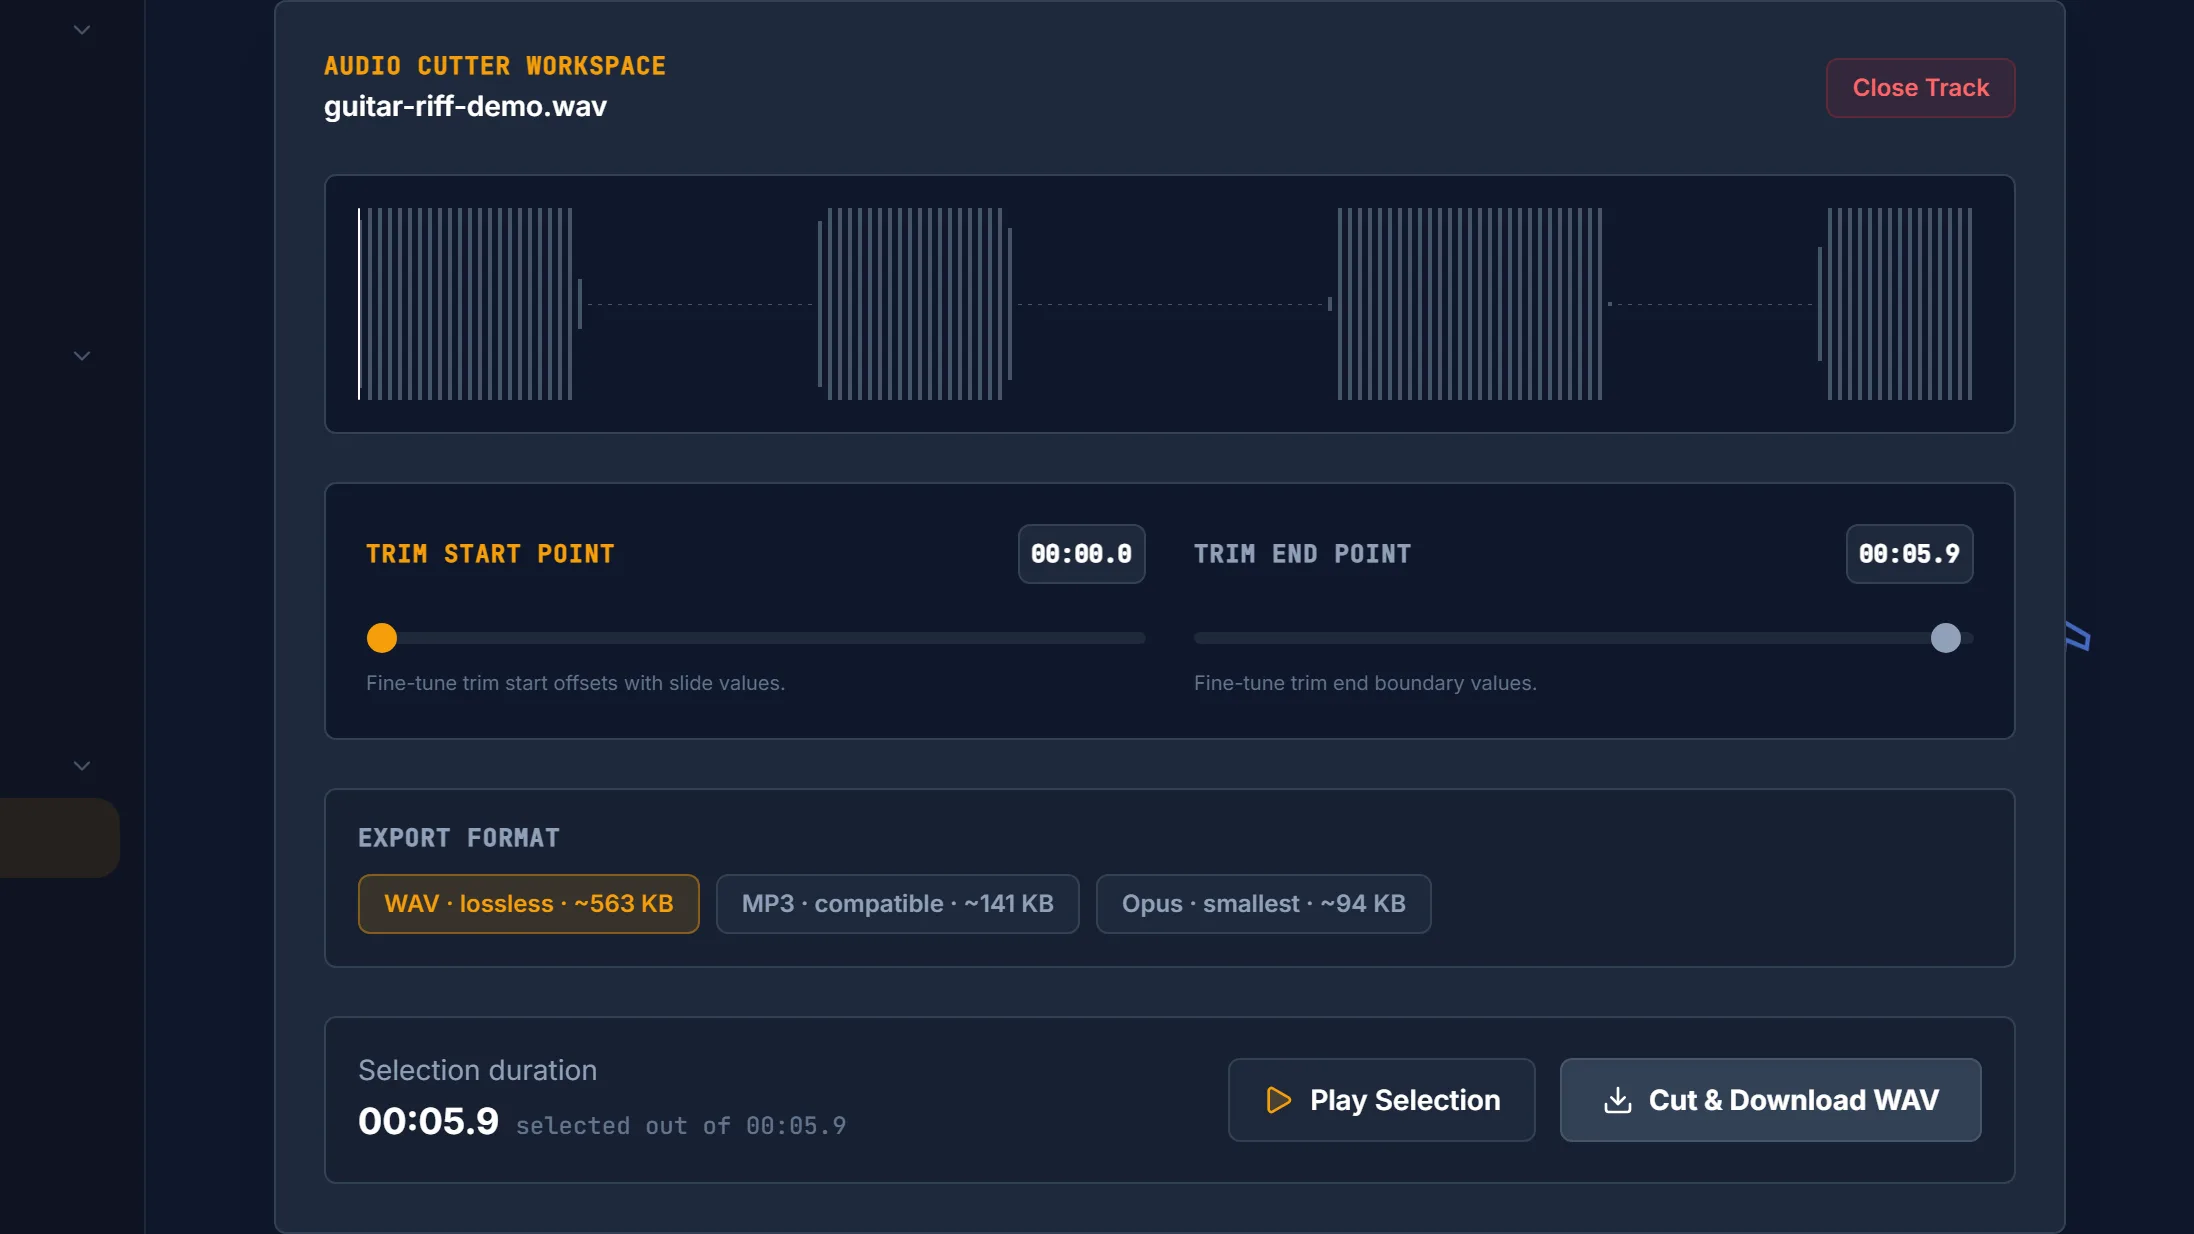
- Set the Trim Start point. Drag the Trim Start point slider to just before the first word or note of your passage. The readout beside it shows the position as minutes, seconds and tenths of a second (for example,
41:07.3). - Set the Trim End point. Drag the Trim End point slider to just after the passage ends. On a long file one pixel of slider can span several seconds, so drag roughly into place, then click the slider and nudge with the arrow keys, 0.1 seconds per press. The start can't pass the end; they stay at least 0.1 seconds apart.
- Click Play Selection and check the region. Playback starts at your start point and stops by itself at your end point. The Selection duration readout shows the clip length, selected out of the file's total. Leave a little breathing room rather than cutting right on the word: a breath before the first syllable, a beat of room tone after the last.
- Pick an export format. WAV is the default and writes your selection as uncompressed 16-bit PCM. MP3 and Opus make smaller files; Opus only appears in browsers whose built-in recorder can encode it, so you may not see it in Safari. The selector estimates the file size for your selection.
- Click Cut & Download. The button label follows your format: Cut & Download WAV, MP3 or OPUS. The clip saves as
cut_plus your original file name. The original file isn't changed.
Pulling several clips from the same recording
Each export is one region, but you don't need to reload the file between clips. After a download, the trim points stay where you left them, so move both sliders to the next passage, check it with Play Selection, and export again.
Every clip saves under the same cut_ name, so rename each one as it lands, while you still remember what it is.
The opposite job, deleting a middle section and keeping both sides, takes two cuts: export the part before it, then the part after, and join them with the Audio Joiner.
Exporting your clip: WAV or MP3
If you came looking for an online MP3 cutter or an MP3 audio trimmer, this does that job. The cut copies the exact samples between your points; what happens next depends on the export format.
- WAV writes those samples as 16-bit PCM without re-compression, so no compression loss is added. The file is much larger than an MP3 of the same length.
- MP3 re-encodes the selection, a lossy step. An MP3 source gets a second round of compression, though at a decent bitrate one extra round is usually hard to hear.
- Opus also re-encodes, into an even smaller file.
A good rule: choose WAV if you'll keep editing the clip, and MP3 if you're sending it to someone. For more on cut points and generation loss, see How to Cut Audio Without Losing Quality.
Troubleshooting
You see a "file is too long" message. The cutter checks length before decoding, because the whole recording is decoded into memory, at roughly 23 MB per minute for stereo audio. On a typical desktop the limit is 120 minutes or 2,000 MB. On phones and low-memory devices it's 45 minutes or 400 MB. If your phone refuses a long meeting, move to a desktop or laptop. If a recording runs past 120 minutes, split it into shorter parts with your recorder's own software or a desktop editor first.
There's a click or pop at the start or end. The cut landed while sound was still playing. Nudge the point into a quieter gap, or add a short fade with Audio Fade; the cutter doesn't add fades itself.
The lecture is a video file. Pull the audio track out first with Video to Audio, then cut the result. How to Extract Audio From Video covers that step.
The clip is too big to email. Export MP3 rather than WAV, or follow How to Reduce Audio File Size for Email.
A note on meetings and lectures
The file is decoded and cut in your browser tab, so your audio never leaves your device, which matters for an internal meeting you'd rather not upload anywhere. Before sharing a clip, check that the people in it agreed to be recorded and that the lecture or meeting allows it.
Related guides
If your meeting clip has background hum or a muffled voice, How to Clean Up a Zoom Recording is the natural next step. For music, How to Cut a Sample or Loop From a Song uses the same technique on a loop. More step-by-step tutorials are in the how-to guides.
Frequently asked questions
Can I extract more than one section from a recording at once? Not in a single export. Vocal Cut's Audio Cutter saves one region per download. You don't have to reload the file between clips, though: the trim points stay where you left them, so you move both sliders to the next passage, preview it with Play Selection, and export again.
Does cutting a section out of an audio file reduce its quality? The cut copies the exact samples between your two points, so the cut itself doesn't change the sound. Any loss comes from the export format. WAV writes the samples without re-compression. MP3 and Opus re-encode the clip, a lossy step, so an MP3 source gets a second round of compression. If you'll keep editing, export WAV.
Is there a length limit for the audio cutter? Yes. Because the whole file is decoded into your browser's memory, the cutter checks length before loading. On a typical desktop it accepts recordings up to 120 minutes or 2,000 MB. On phones and other low-memory devices the limit is 45 minutes or 400 MB. For a long recording that a phone rejects, use a desktop or laptop instead.
Can I type exact timestamps for the start and end points? No. There are no typed timestamp fields. You set the start and end points with two sliders, which show the position in minutes, seconds and tenths of a second. For precise placement, drag a slider close to the spot, then click it and use the arrow keys, which move it in 0.1-second steps. Play Selection lets you check the edges by ear.