Audio Trimmer: Trim Dead Air From Audio Ends
To trim dead air from the start and end of a recording, load it into the Audio Cutter, a free audio trimmer that runs in your browser, move the start point to just before the first sound and the end point to just after the last, then download the cut. For a single file it takes a couple of minutes, most of it spent listening. There's no account, and your audio never leaves your device.
This guide covers only the two ends of a file: the silent lead-in and the trailing tail. Gaps in the middle are a different job. For pauses between words or songs, use the Silence Remover and see How to Remove Silence from Audio. For pacing a whole conversation, see How to Trim Podcast Dead Air.
Why the silence at the ends matters
Almost every recording starts before the sound does. The file catches the click of the record button, a count-in, a chair creak, a few seconds of hiss before the first word. The end has the same problem in reverse: the pause while you reach over to stop recording.
A few seconds of lead-in looks harmless until the file goes somewhere:
- Joined tracks end up with long, uneven gaps between pieces.
- On a feed or social post, listeners hear nothing at first and scroll past.
- A take sent to someone else sounds like a raw dump rather than a finished file.
Trimming the top and tail fixes all three without touching anything in between.
What you'll need
- The audio file on your device. The cutter works on a file you already have; it doesn't take a link.
- Headphones, because quiet breaths and room tone are easy to miss on laptop speakers.
How to use the audio trimmer, step by step
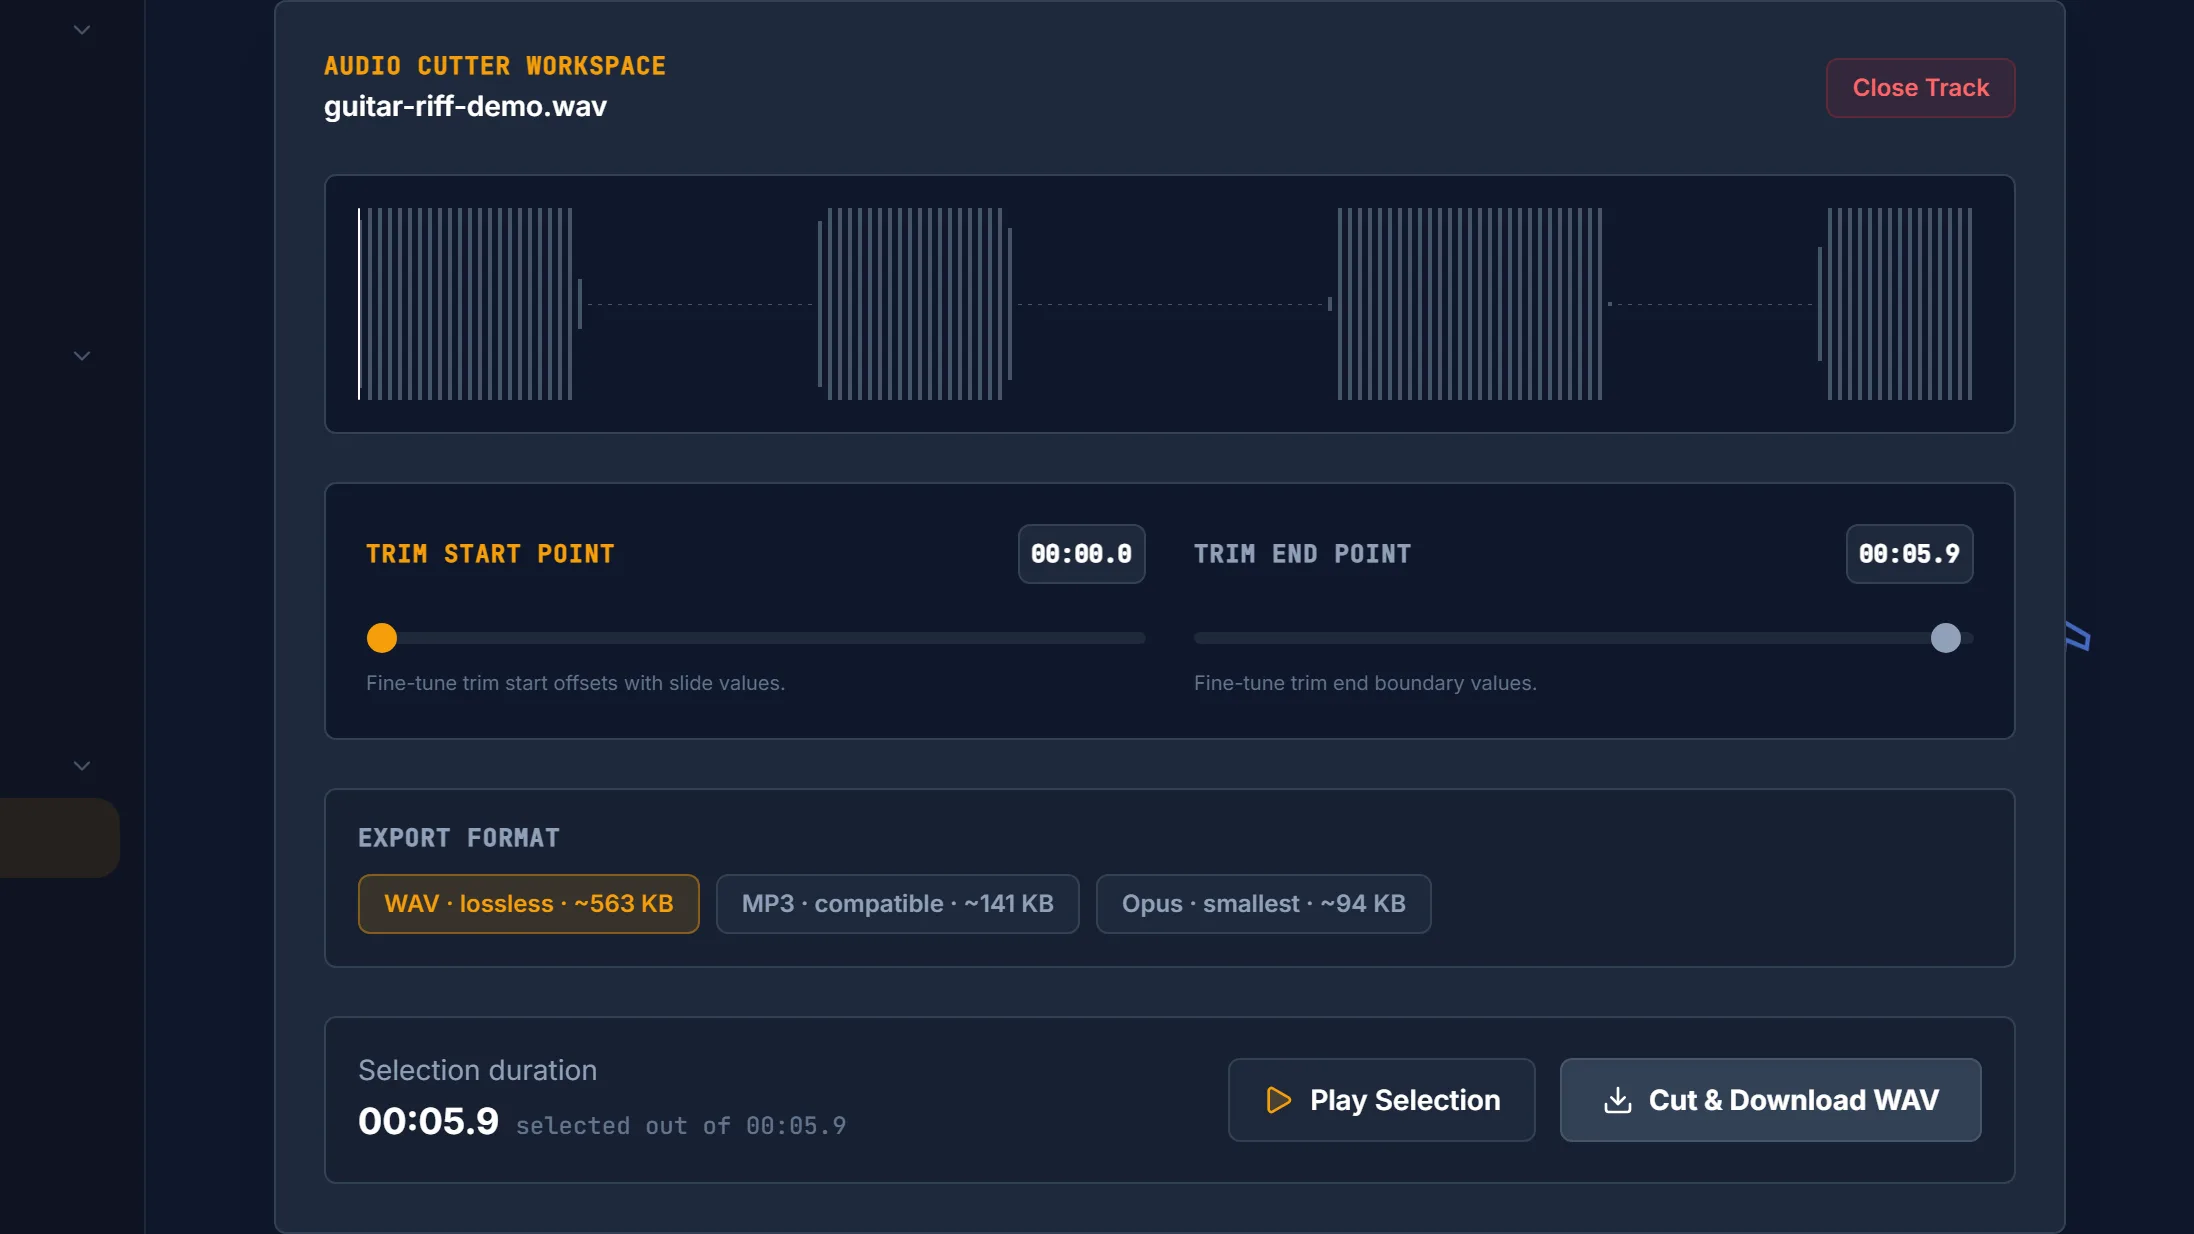
- Open the Audio Cutter and drop your file into the dropzone. Your browser decodes it, showing "Decoding audio binary buffers..." while it works. Then a waveform appears in the Audio Cutter Workspace.
- Find where the sound starts. The flat line at the left of the waveform is your lead-in. Drag the Trim Start point slider until it sits just before the first bump of real sound. The readout shows the position in minutes, seconds, and tenths.
- Find where the sound ends. Drag the Trim End point slider back from the right edge until it sits just past the last sound, including any fade or ring-out (more on that below).
- Check the kept length. The Selection duration readout shows how much you're keeping, selected out of the total length of the file.
- Click Play Selection and listen. Playback starts at your start point and pauses by itself at your end point. The button switches to Pause Selection while it plays.
- Nudge if needed. Click a slider, then use the arrow keys to move it one step at a time. Each step is 0.1 seconds.
- Pick a format and click Cut & Download. Choose WAV, MP3, or Opus, check the estimated file size, and click the button (it reads Cut & Download WAV, MP3, or OPUS). The file saves as
cut_plus your original file name.
When you're done, Close Track clears the workspace for the next file.
Where exactly to cut
Quiet sounds barely show on the waveform: a breath before the first word, a soft pick attack, the end of a cymbal fading. Trim by ear with Play Selection, not by the picture.
Two rules of thumb hold up well:
- At the start, leave a short breath of room. Setting the start point a fraction of a second before the first sound keeps the attack intact and avoids a start that feels abrupt. Cutting right on the first visible peak often clips the breath or the front edge of a note.
- At the end, let it ring out fully. Reverb tails, sustained chords, and room ring run on past where the waveform looks flat. If the ending sounds chopped when you play it back, move the end point later.
These are habits, not a standard. A voice memo can be trimmed tighter than a piano piece with a long natural decay.
Using it as an MP3 cutter online
You can use the Audio Cutter as an online MP3 cutter: drop in an MP3, set the two points, and export. The cut itself is exact. It copies the samples between your start and end points and nothing else. What happens next depends on the export format:
- WAV · lossless writes those samples without re-compression. Nothing more is lost, but the file is much larger than an MP3.
- MP3 · compatible re-encodes the selection at 128, 192 (the default), or 320 kbps. If your source was already an MP3, that adds another lossy generation. At 192 or 320 kbps one extra round is usually hard to hear, but repeated rounds add up, and re-encoding at a lower bitrate than the source makes it worse.
- Opus · smallest also re-encodes, into a smaller file. This option may not appear in some browsers, such as Safari.
If you'll keep editing, export WAV and encode to MP3 once at the very end. For the trade-offs between formats, see MP3 vs WAV vs FLAC, and for more on avoiding generation loss, see How to Cut Audio Without Losing Quality.
Troubleshooting
There's a click or pop at the start or end. The cutter doesn't add fades, so a cut that lands while sound is still playing can start or stop the waveform abruptly. Move the point slightly into the silence, or add a short fade with Audio Fade. How to Fade Audio In and Out walks through it.
I can't land exactly on the point I want. The sliders move in 0.1-second steps, not milliseconds. For trimming silence that rarely matters: err toward keeping a little extra room.
The "silence" isn't silent. If you hear steady hiss or hum in the lead-in, that's the noise floor, and it continues under the sound too. Trimming removes it from the ends only. See What Is a Noise Floor?, and clean it up with the Noise Reducer if it's distracting.
The file got bigger after trimming. You probably exported WAV from a compressed source like an MP3 or M4A. WAV is uncompressed, so a shorter WAV can still be several times the size of the original. Export MP3 or Opus if size matters more than avoiding re-encoding.
The Opus option is missing. It only shows when your browser can encode Opus. Use WAV or MP3, or switch browsers.
What to do next
If long pauses remain inside the file, run it through the Silence Remover. To even out the level, see How to Normalize Audio Loudness (LUFS). A short fade-in and fade-out with Audio Fade hides any leftover room tone at the edges.
If you only want one passage from the middle of a long recording, such as one answer from a lecture or one decision from a meeting, see Audio Cutter: Extract a Section From a Recording.
For more tutorials like this one, browse the how-to guides.
Frequently asked questions
How do I remove silence from the beginning and end of an audio file? Open the file in an audio trimmer such as Vocal Cut's Audio Cutter. Move the start point to just before the first sound and the end point to just after the last, then listen to the selection to check nothing is clipped. Export the result as WAV, MP3, or Opus. The trim runs in your browser, so your audio never leaves your device and no account is needed.
Does trimming an MP3 reduce its quality? The cut itself doesn't change the sound; it keeps the exact samples between your two points. Quality loss comes from the export. Saving as MP3 again re-encodes the audio, which adds another lossy generation to an MP3 source. Saving as WAV avoids re-encoding but makes a much larger file. If more editing follows, export WAV and encode to MP3 once at the end.
Why is there a click at the start of my trimmed audio? A click usually means the cut landed while sound was still playing, so the waveform starts or stops abruptly instead of rising from silence. Vocal Cut's Audio Cutter doesn't add fades automatically. Move the start or end point slightly further into the silence, or apply a short fade-in or fade-out with an audio fade tool to smooth the edge.
What's the difference between trimming audio and removing silence? Trimming cuts the file at two points, so only the silence before the first sound and after the last one is removed. Everything in between stays as recorded, including pauses. Removing silence scans the whole file and shortens every quiet gap that crosses a threshold, including gaps in the middle. Use a trimmer for clean ends and a silence remover for long pauses inside a recording.